Altair AI Cloud Migration
The Altair AI Cloud Migration is an Altair AI Studio extension, that helps you to migrate your projects from Altair AI Studio / Altair AI Hub to the Altair AI Cloud platform.
Please note that the extension requires an Altair AI Studio of version 10.3 or later.
If your version of Altair AI Studio is older than 10.3, you should instead download the migration tool.
Limitations
Before proceeding, please understand the new cloud concepts. The new workflows and operators are compatible with the old ones, but the storage framework has fundamentally changed, so be aware of the following limitations:
- Because data assets are based on tags, and not folders, all links to data (e.g., Retrieve and Read operators) will break. You will need to reconfigure them in the cloud.
- In a similar way, all Store operators will need to be reconfigured to point to Files or a project location.
- The most popular extensions will be available, but others, including all custom extensions, will not.
Instructions
Using the Altair AI Cloud Migration extension is very easy. As a first step, install the extension from the marketplace. Here's a guide on how to install extensions from the marketplace: Adding Extensions
Start the migration
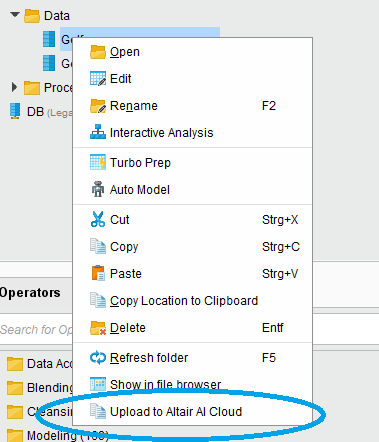
In Altair AI Studio in the "Repository" panel, find the project, repository or file, you would like to upload to the cloud. Right click it and click on "Upload to Altair AI Cloud". This opens a migration window.
SSO Login
When the migration window starts, you'll see the SSO Login screen:
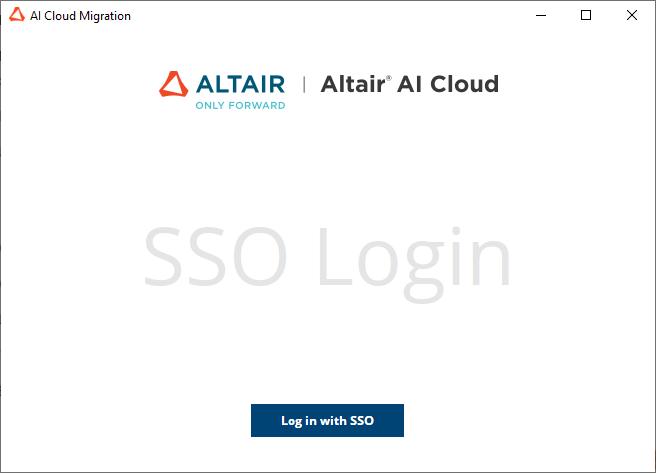
Click Log in with SSO, and you'll be redirected to your browser, where you need to log in with your company name, username and password. If everything goes well, you'll see the message Login Successful.
Select project or file
Go back to the migration window. Depending on the selected item in the "Repository" panel, you will see different options. If you selected a file to upload, you will be presented with a file selection window.
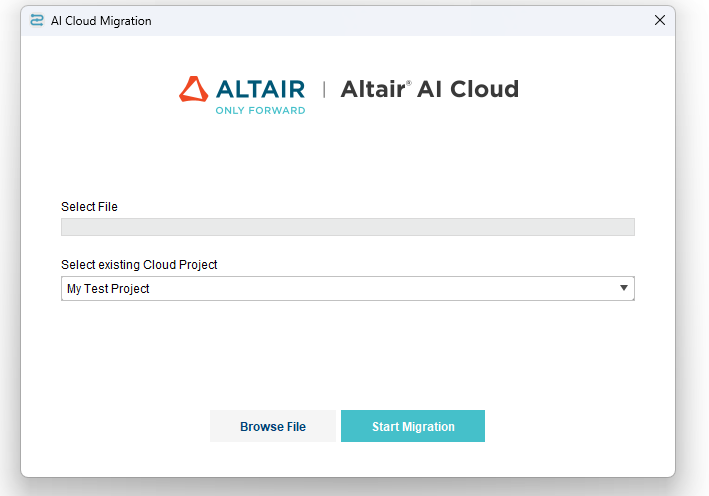
The file should be preselected, but you can change it if you want to upload a different file. Click Browse File to select a different file.
If you selected a project or repository to upload, you will see a project selection window.
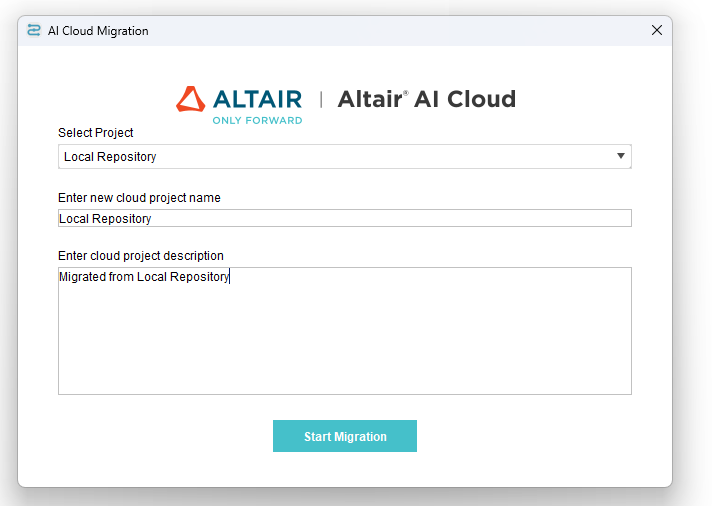
You can now select a file or project from the respective drop-down menu. Type the name of the new cloud project and add a description. The tool pre-fills some standard values for you.
Once you click on Start Migration, you can follow the progress of the migration.
Progress
The migration tool uploads your artifact(s), taking the following actions:
- Processes, Python code, models, performances and all other Altair AI Studio objects are added to the new project.
- Data is stored and linked to the project, so it's still usable there. That includes tables, images, text files, Excel sheets, CSV files and, in general, non-Altair AI Studio objects. Files are organized by tags, not folders, so folder names in your Altair AI Studio or Altair AI Hub project become tags that are assigned to the appropriate files.
When the migration is finished, you'll receive a summary -- with warnings, if the tool was unable to convert or upload some of the files.
Take a look at your cloud project and check that the migration has worked as expected, recalling that there are some limitations.
Data is visible in the Data tab. If data was stored in folders, the folder names appear as tags. All other files are listed in the Content tab.
If you have more files or projects to migrate, repeat the process.