REST API
Features
Exactly one workflow can be served in each deployment, so if you need multiple workflows deployed, you should create a deployment for each one.
Only workflows are supported in REST API deployments.
When a REST API deployment is created, a dedicated, isolated container will be provisioned and will be ready to serve requests exclusively for the deployed workflow.
When creating (or editing) a deployment, its resource allocation constraints must be specified. The deployment will consist of a single container instance and will not be horizontally scaled. Resource allocation consists of the maximum number of virtual CPUs and maximum amount of memory (in GiB) the deployment is allowed to consume.
Due to the always-on nature of the REST API deployment, it will continuously consume resources which count against your resource quota, until its termination.
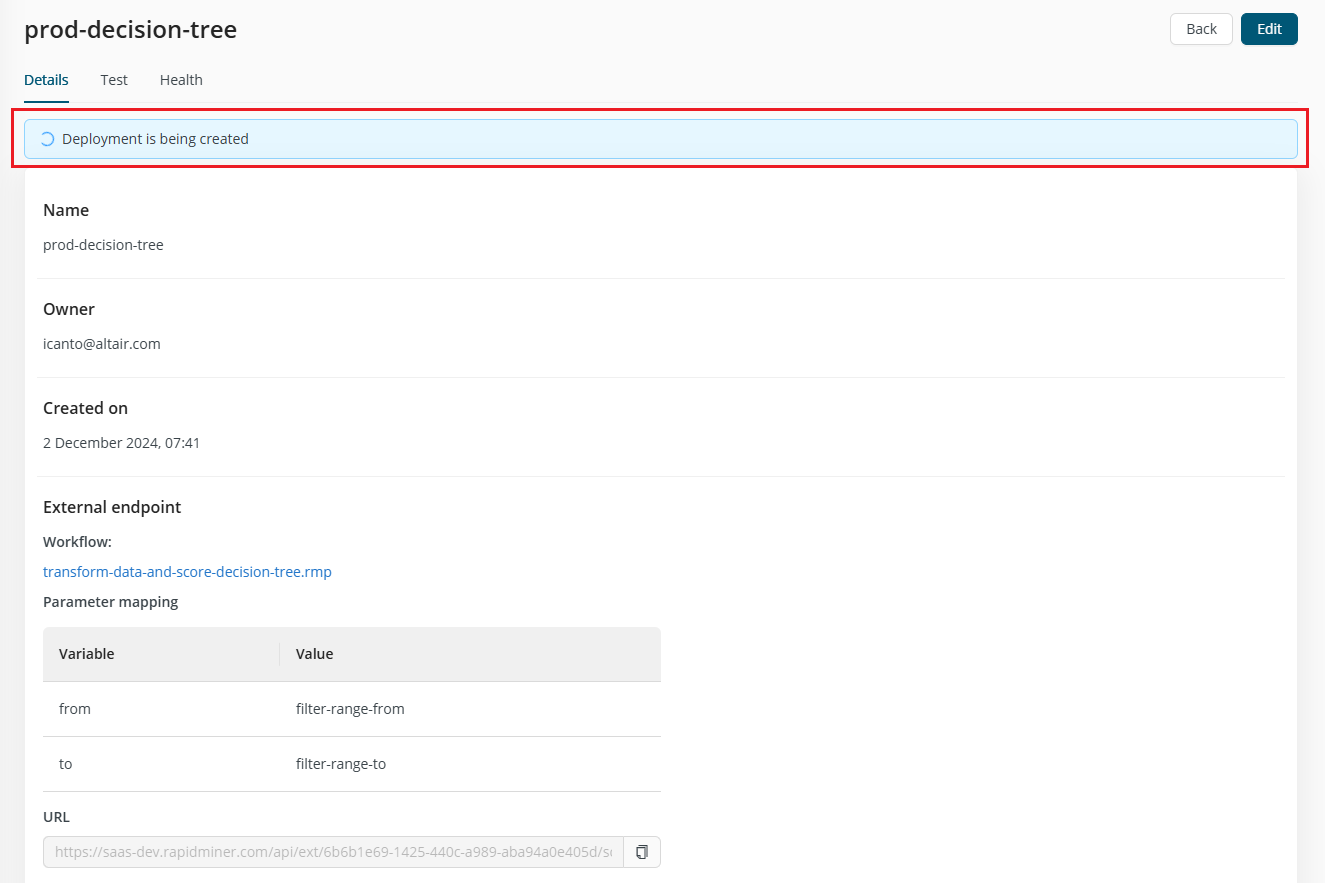
The deployment will have its own, unique address accessible on the public internet. This address will be automatically generated when the deployment is created. This unique external address can be reused from other deployments, which can be useful in certain scenarios. For more details, see external address management.
Workflow variables can be provided as query parameters if needed, and they can be mapped to shorter, simpler names when creating the deployment. Similarly, the workflow itself can be mapped to a simpler, shorter naming scheme in the deployment URL.
Inputs and outputs
Aside from the previously mentioned workflow variable inputs, REST API deployments can take data as input, and also return data as output. Input data are always passed to the workflow via the first Input operator (as defined by the execution order).
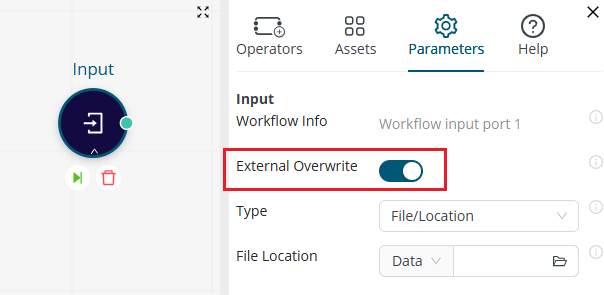
The Input operator must have External Overwrite enabled so that it can process the input properly.
The data on the workflow's first output port will be returned in the response (as defined by the execution order).
Inputs and outputs are passed as JSON representation of the Altair AI Cloud data format, but you can transform this format when creating the deployment.
Create a REST API deployment
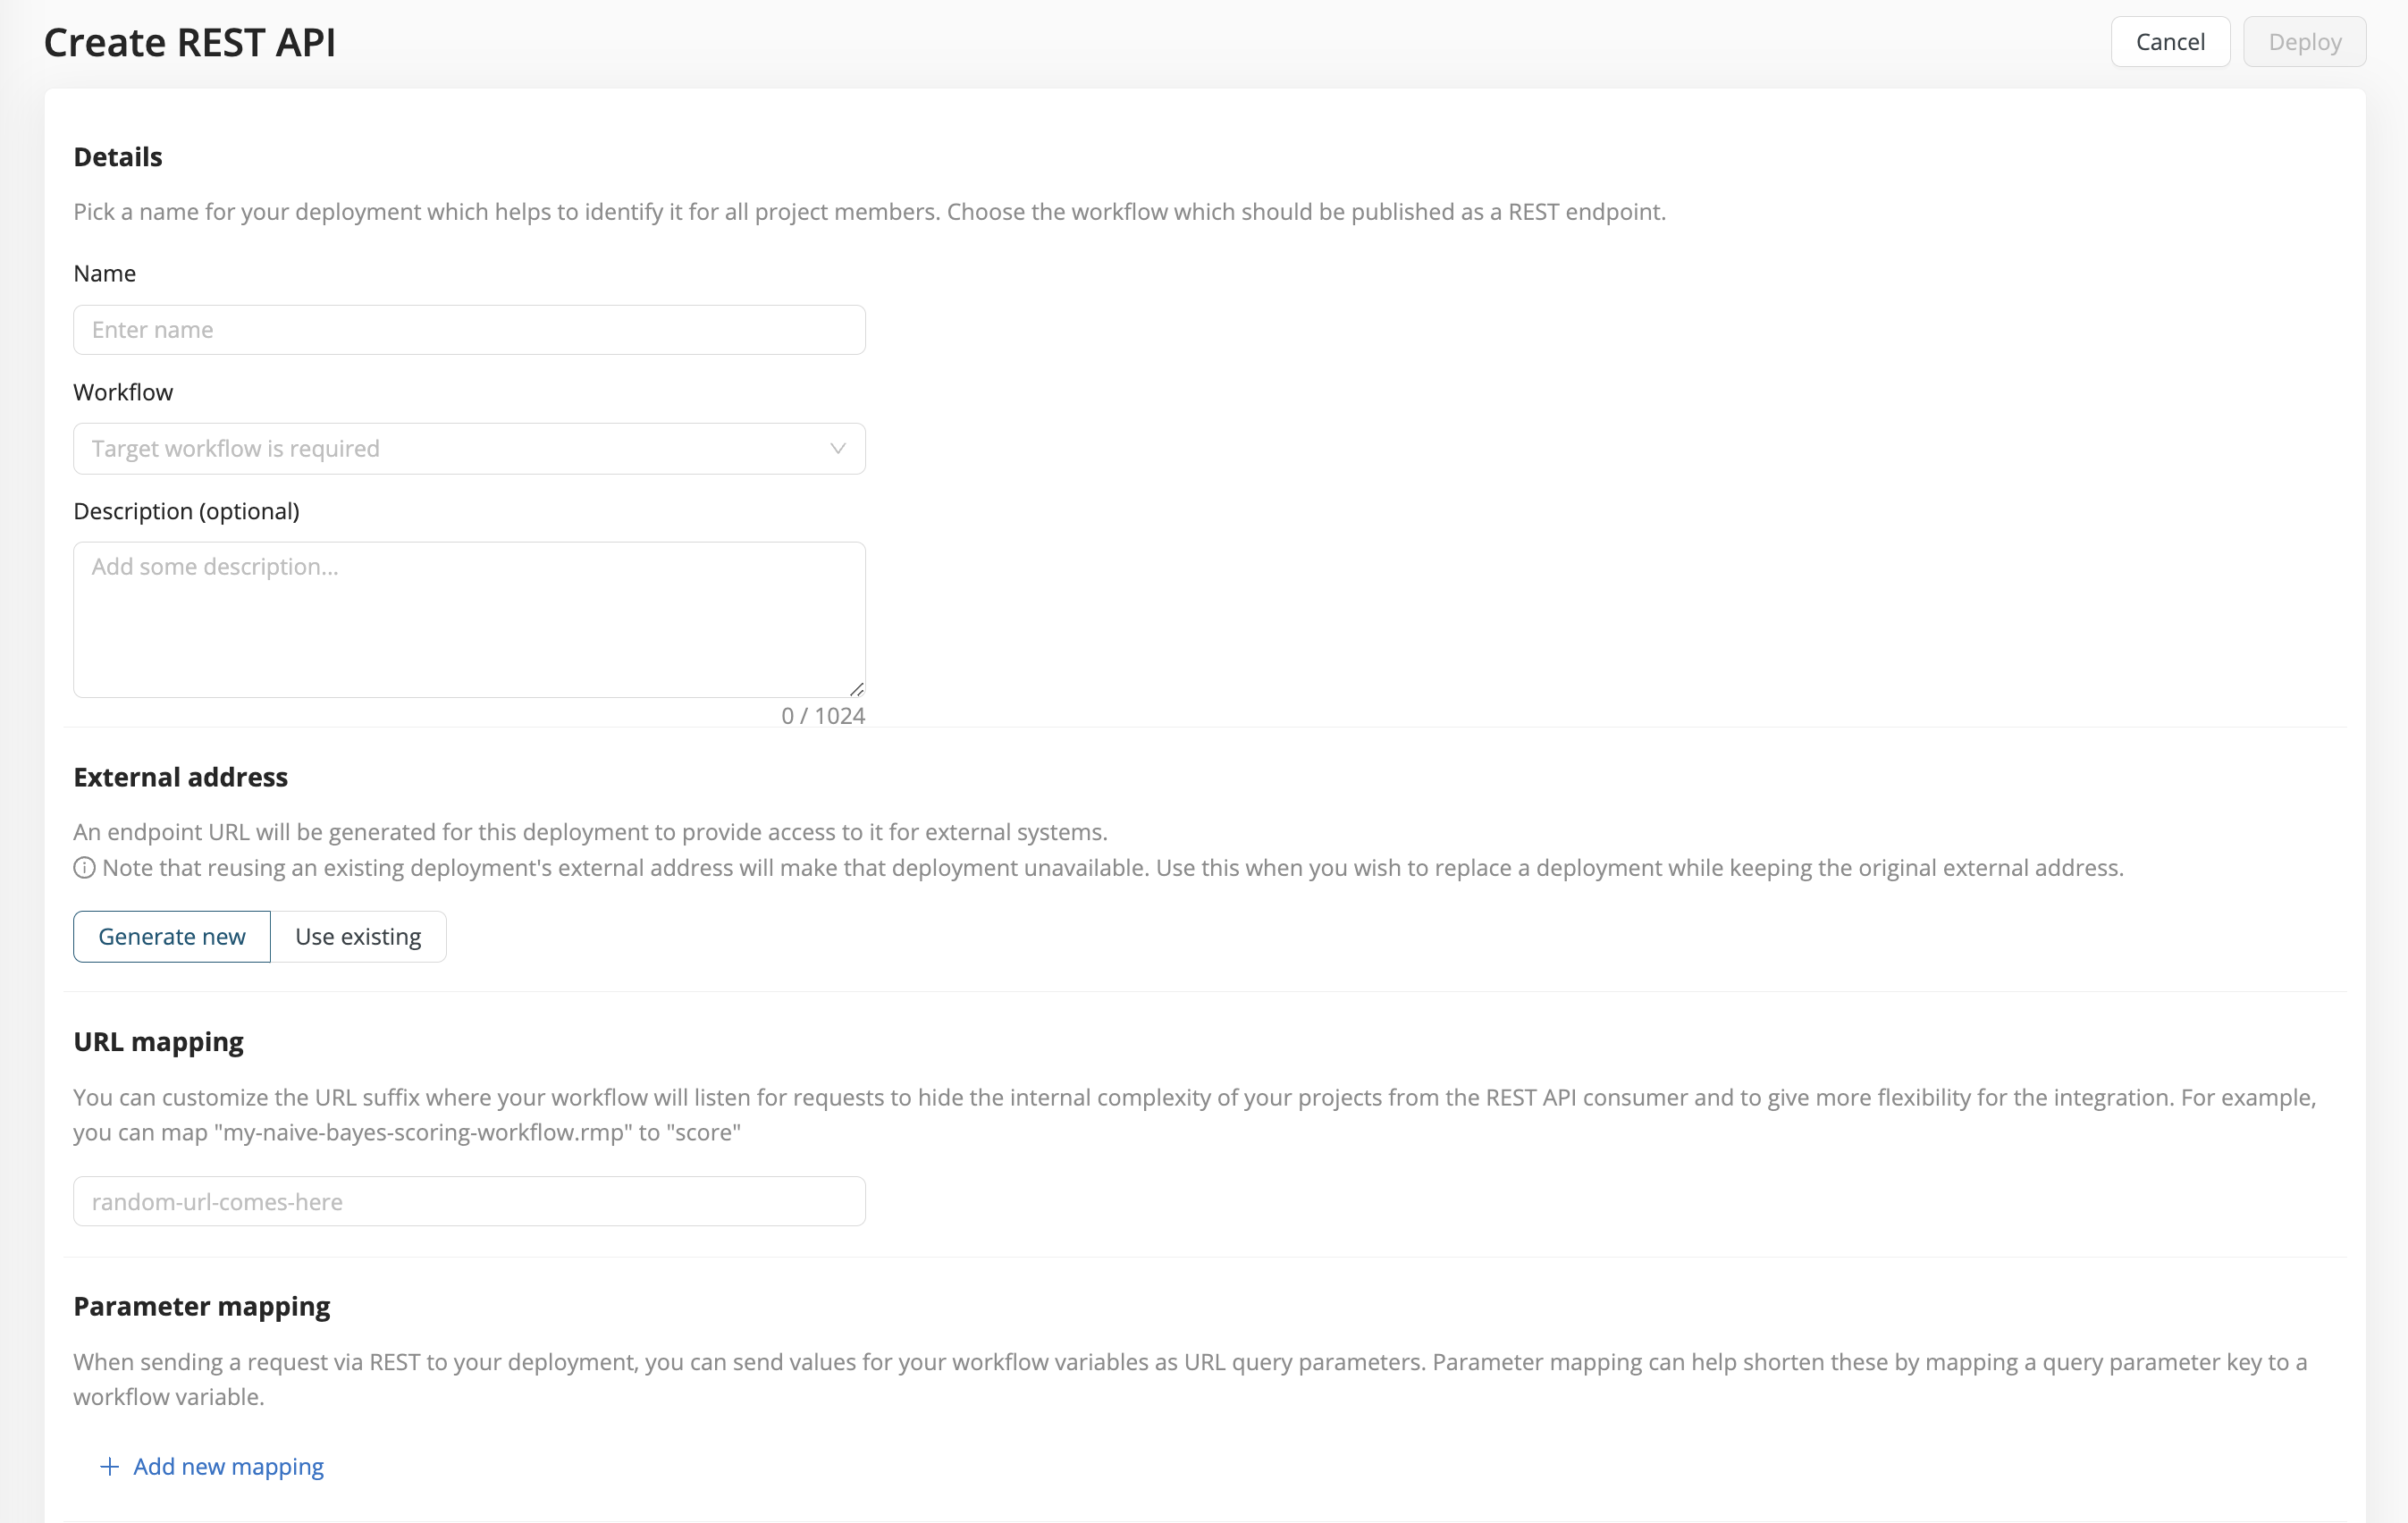
When you create a deployment, select REST API as your deployment type.
-
Name - Give your deployment an arbitrary name.
-
Workflow - Select the workflow you wish to deploy.
-
Description (optional) - Describe what the workflow does.
-
External address - Choose Generate new for a new deployment. More complex cases will be explained below.
-
URL mapping - You may choose to use the workflow name in the URL. But to shorten, simplify, or hide this name, you can map it to a new name in the deployed URL.
-
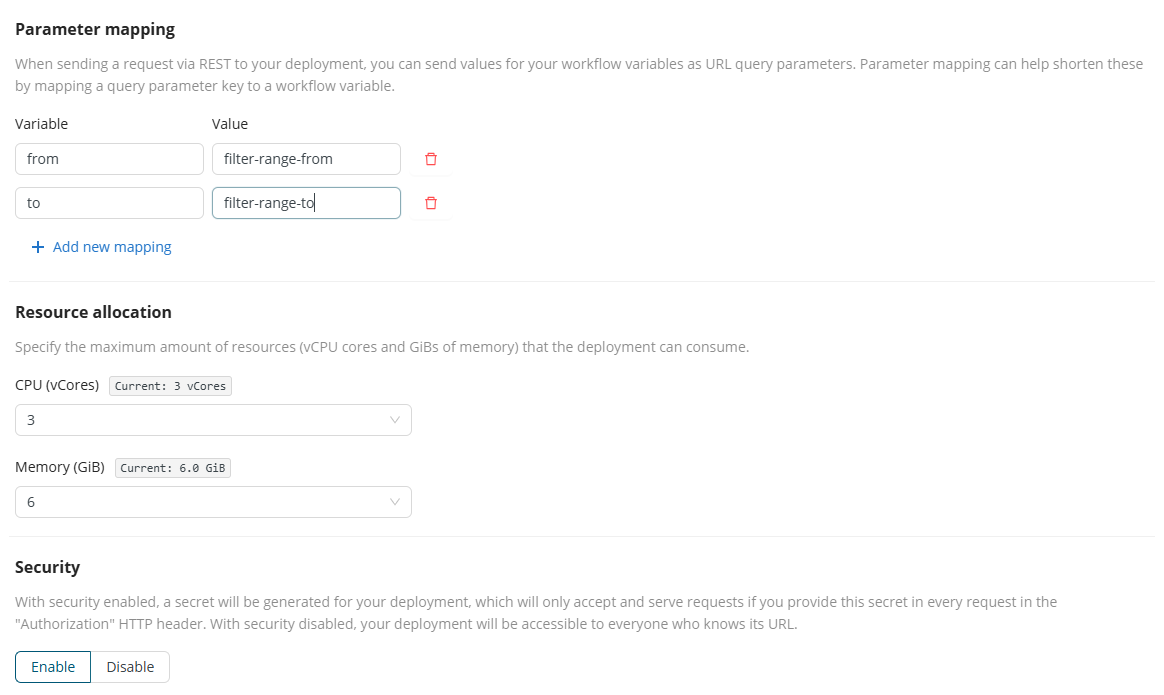
Parameter mapping - If your workflow needs further inputs as workflow variables that you wish to expose, provide them here.
- Value - The parameter name in the workflow
- Variable - You may choose to use the workflow parameter name also for the deployment. But to shorten, simplify, or hide the parameter name given by Value, rename it in Variable. The Variable name is the one that appears when invoking the REST API.
-
Resource allocation - Select the resource quota the deployment is allowed to consume.
-
Security - You can add a layer of security for your endpoints (this setting is enabled by default; it can be disabled if simpler access is preferred).
Transformer (optional)
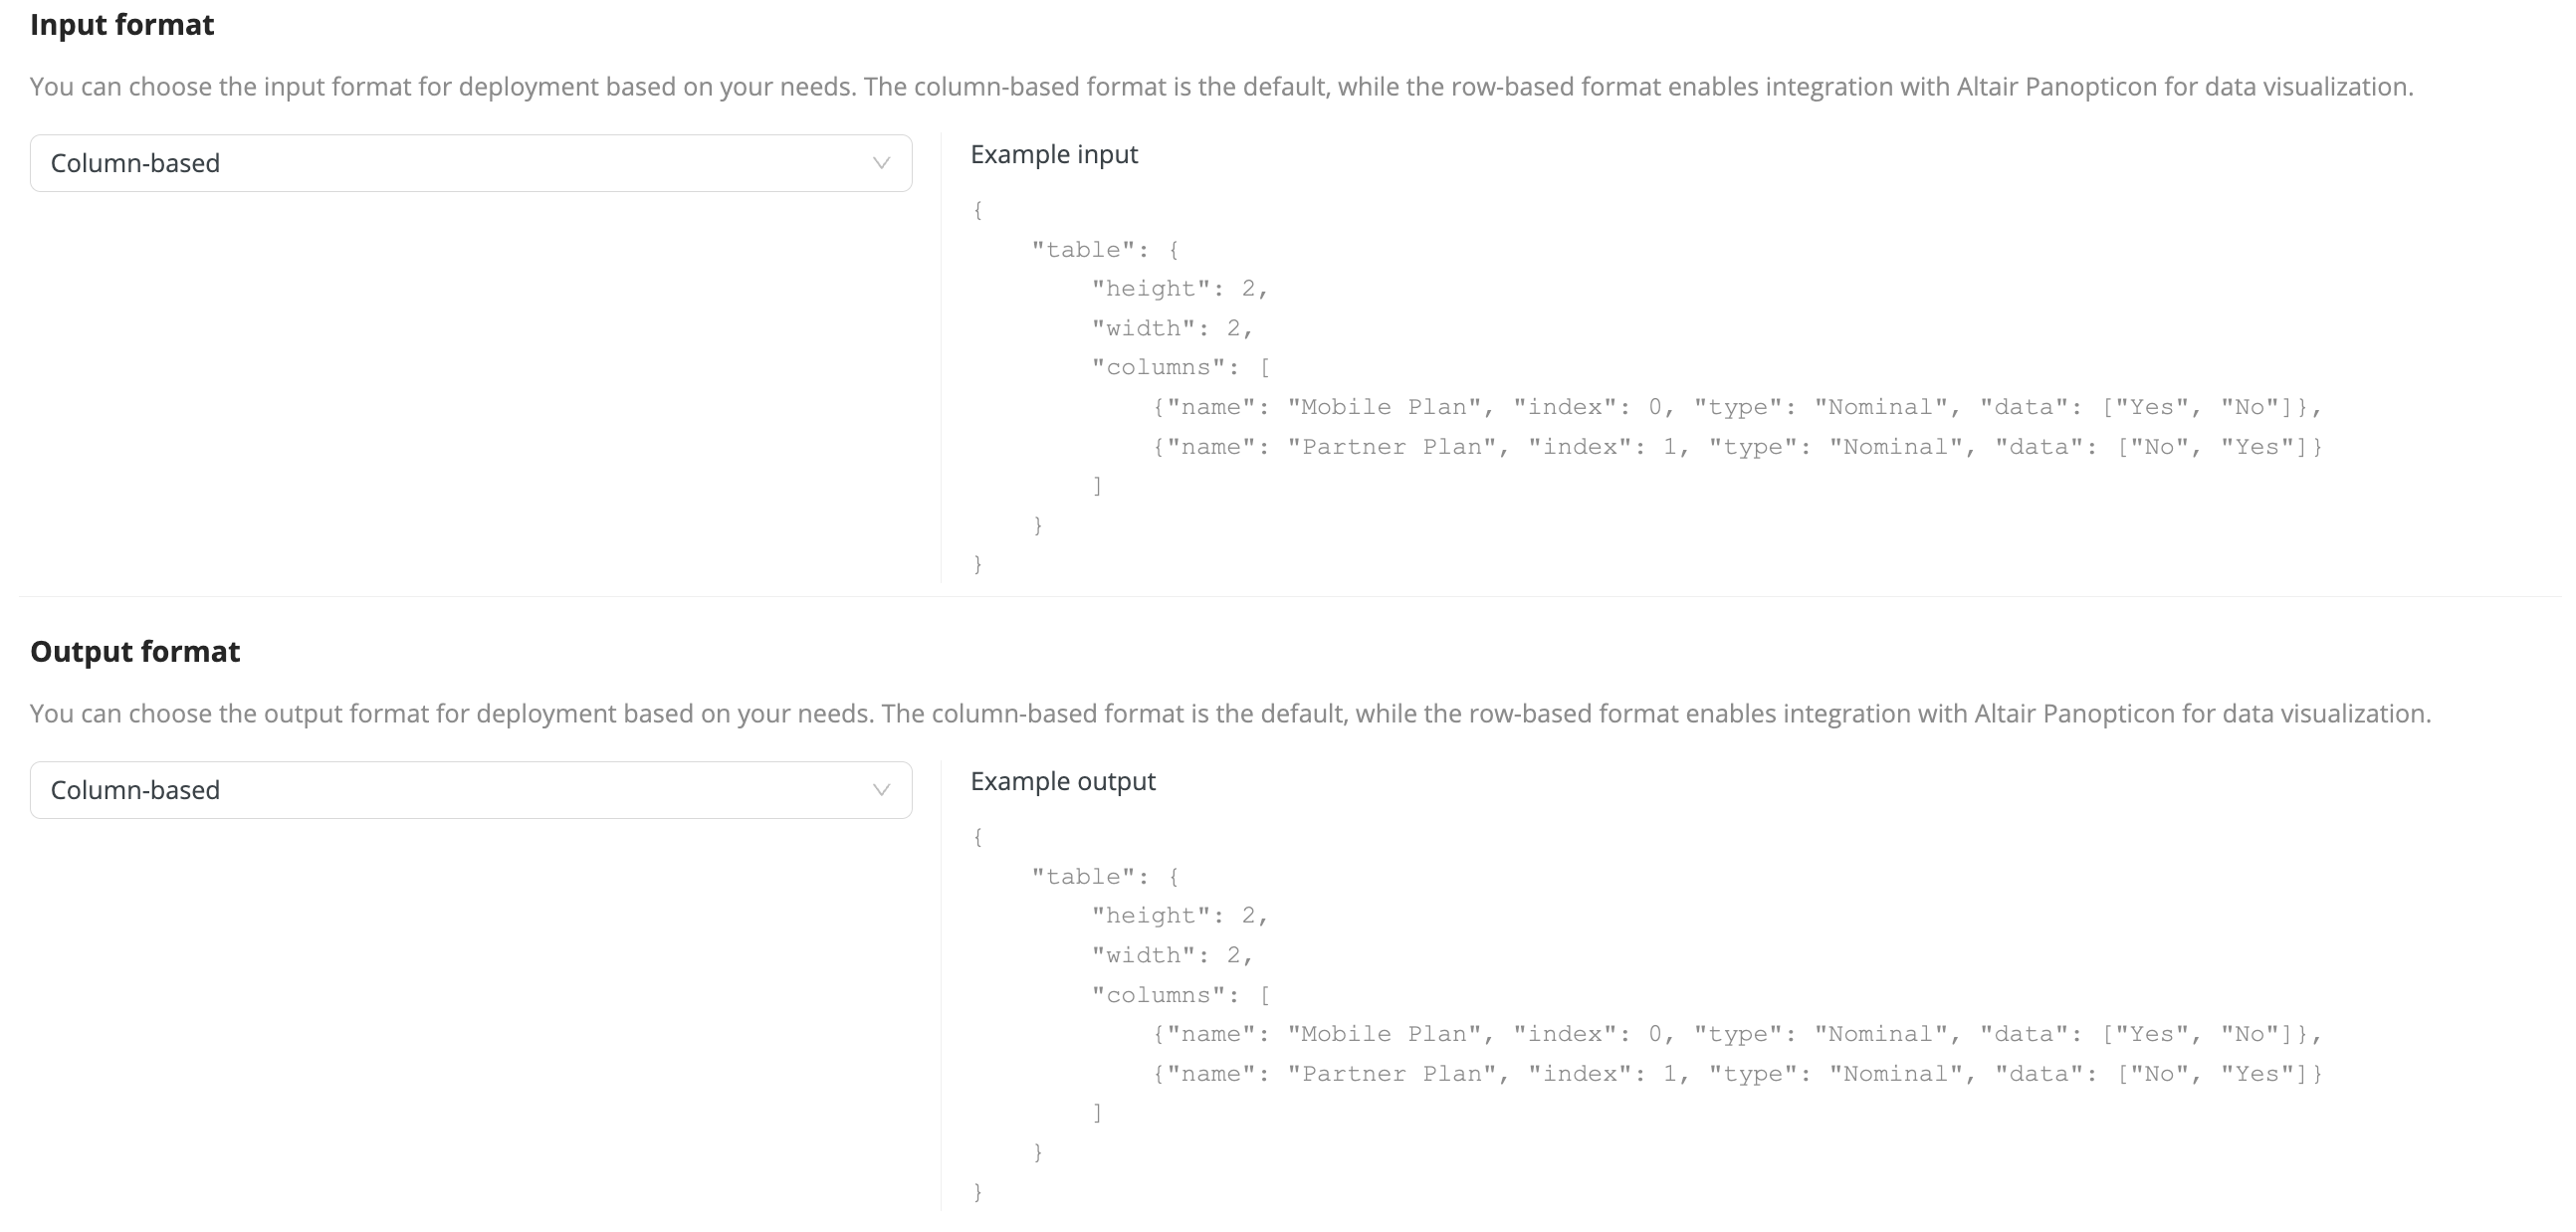
Finally, you can transform the input or the output, to give you better flexibility when setting up your integrations. Both for inputs and outputs the column-based format is the default, while the row-based format enables integration with Altair Panopticon for data visualization.
Note that there is no difference in behavior between the following two states:
- the transformer is off
- the transformer is on, with the default column-based format.
The behavior only changes when you choose a row-based format for the input or the output. In the future, other transformations will be available.
Read more: Transformer header options
Start the deployment
Click Deploy to start the deployment.
After deployment, you are directed to the Deployment feedback screen, which clearly indicates whether your deployment is ready to use.
External address management
External addresses generated for REST API deployments can be reused for a different REST API deployment. This comes in handy when the deployment is already integrated into another business application and the deployment needs to be updated (good examples for this are model retraining scenarios, or simply finding a better performing model for that particular use-case). In this case, the way the deployment is accessed (location and authorization) should remain unchanged while the workflow being served is replaced.
To do this, create a new deployment by following the steps above to deploy your new workflow (or redeploy the same workflow using a newer model).
This time, under External address, select Use existing and pick the name of your existing deployment.
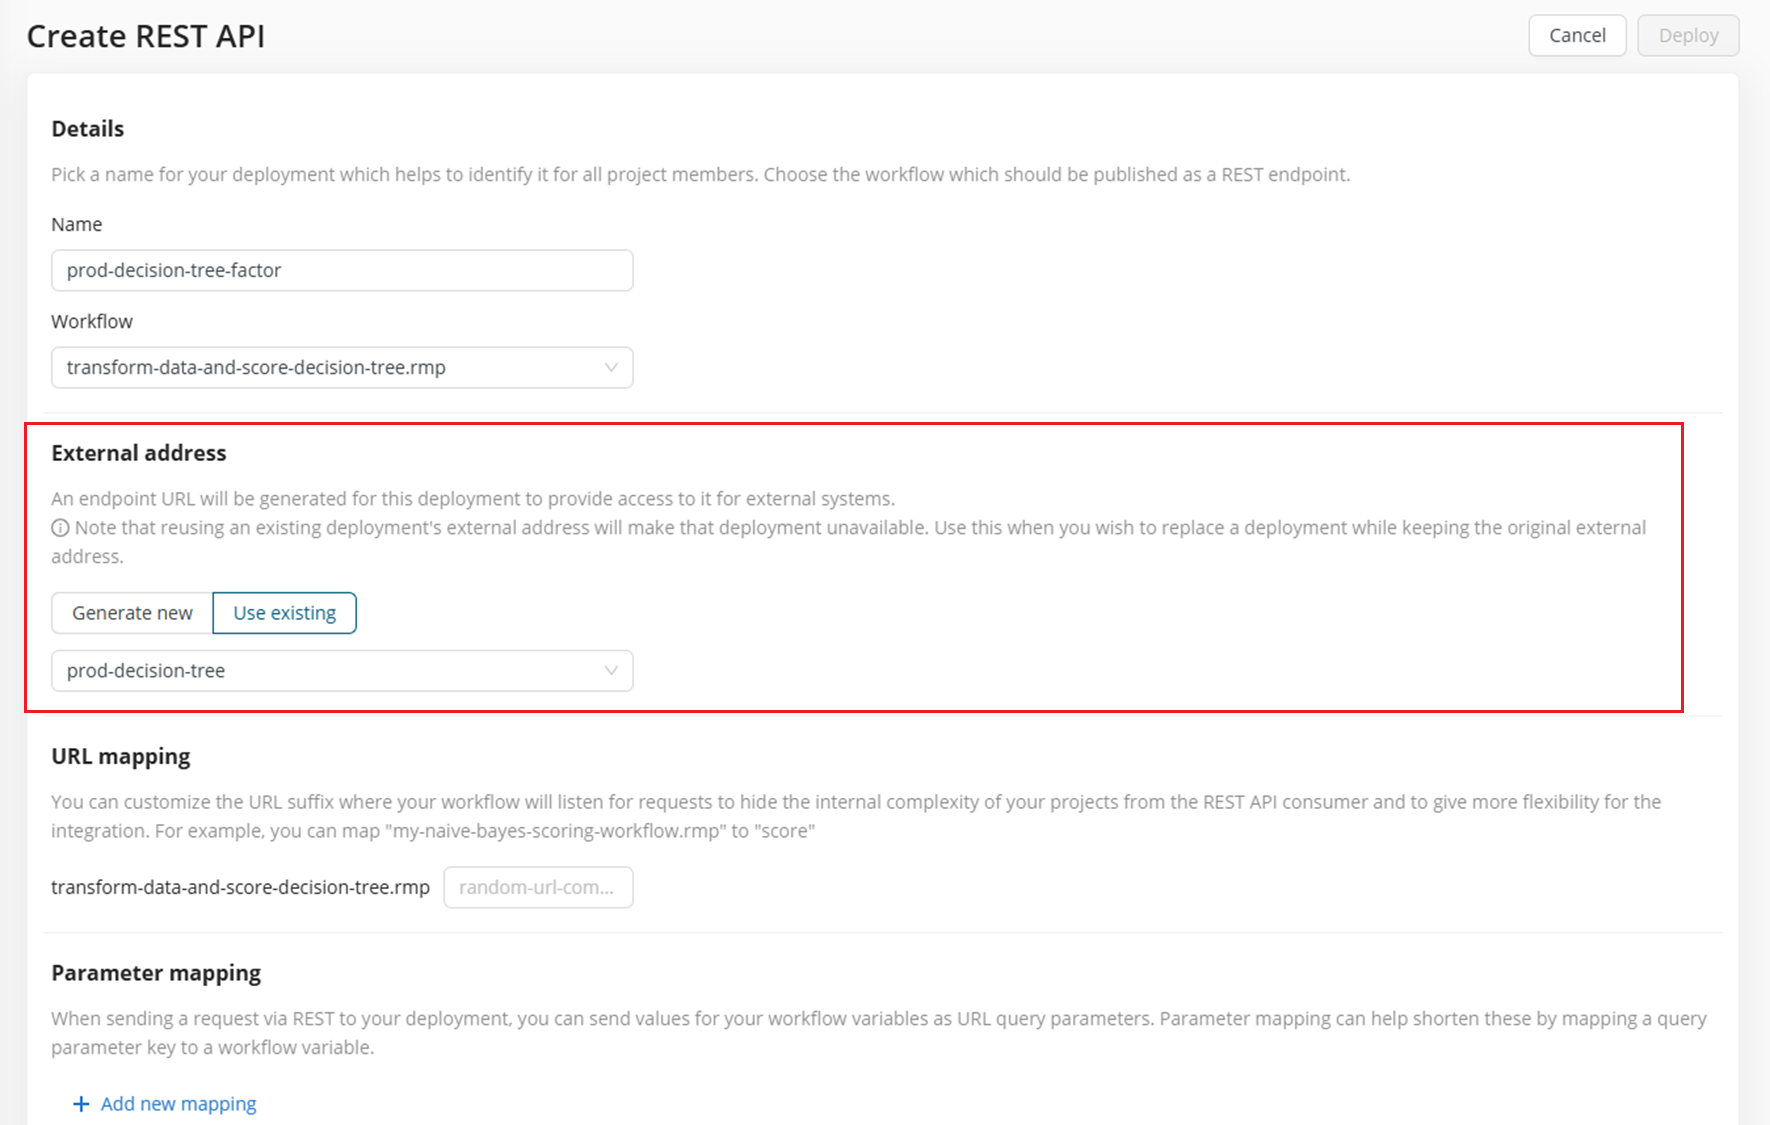
When your deployment has security enabled, the security token will "move" together with the reused external address to ensure there is no need to change anything on the other end of the integration.
When you create a deployment that uses an existing address, the old deployment will become inaccessible. The deployment will keep functioning and you can then either edit it and generate a new address for it, or delete it, once the new deployment is up and running.
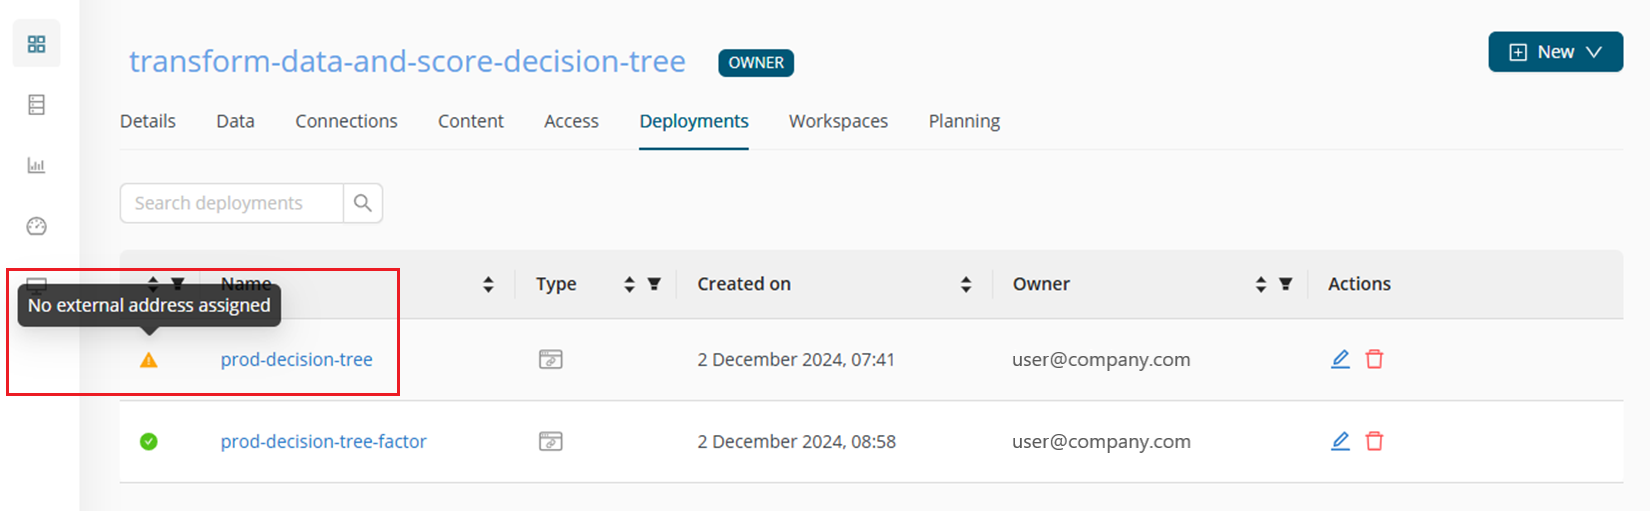
On the Deployments tab, both deployments will be visible. The old one, with no assigned external address, will be marked with a warning status, as seen below:
Security
REST API deployments are accessible on the public Internet, which means that any actor who knows the deployment's address can interact with it. The deployment address is randomly generated and difficult to guess (also, not possible to compute based on the account ID or user ID), which already provides security by obscurity. In some cases, especially when simplicity is key, this might prove sufficient. However, it is possible to protect the deployments with a pre-shared secret.
Whenever Security is enabled (which is the case by default), we generate a secret for the deployment. This secret must be provided in the Authorization HTTP header in the format DW-Secret secret_value with each request that is sent to the REST API deployment. The secret is shown during deployment creation time on the feedback screen along with the deployment address, and can also be viewed on the Deployment Details page.
If the correct secret is not provided with the request, the deployment will respond with HTTP 403 Forbidden.
Security can be enabled for new deployments, but you can also edit existing deployments and add security later.
When you disable security on a deployment, the previously used secret will be destroyed and is not possible to recover.
If you reenable security, a new secret will be generated.
Test your deployment
Once the deployment is up and running, you’ll be able to test it internally within AI Cloud or externally with a curl command for example. The Test tab of the deployment is created to help in both cases.
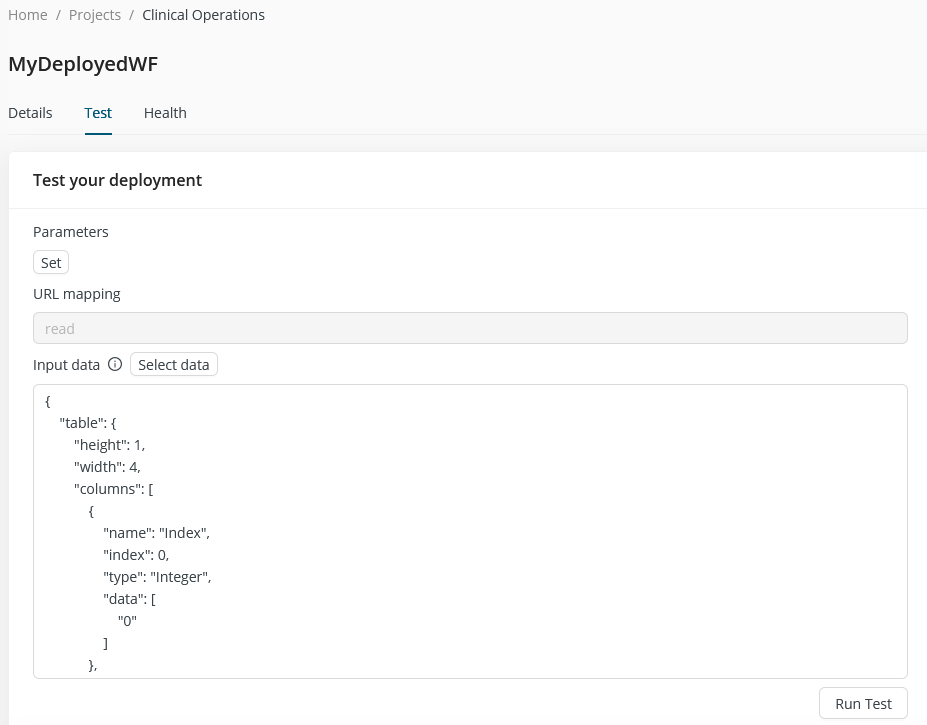
You can modify the pre-generated code in the Input data field, add the data in a format that your deployment expects as input, and click the Run Test button to get the reponse in the Result field. For external testing, if the request comes from outside of AI Cloud, the deployment only accepts requests that follow a certain format. The generated curl command at the bottom of the page shows the correct format, and it is updated based on what you have written in the Input data field. If you set up a secure endpoint, the authorization token is also added to this test curl command.
If you have configured parameters for your workflow, you can set these on the test tab, after clicking the Set button. Note that the curl command invokes the deployment parameter Variable that you set when you created the deployment.
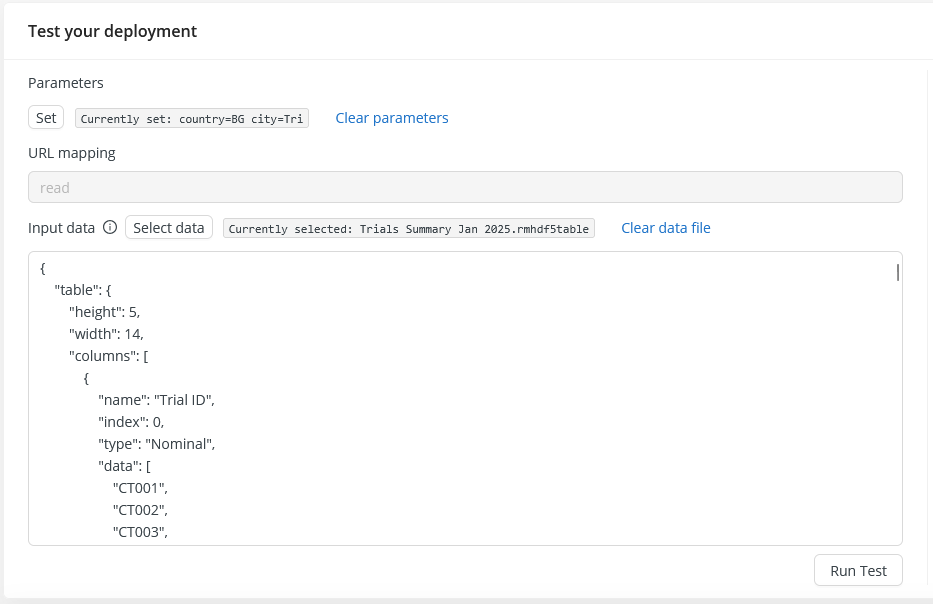
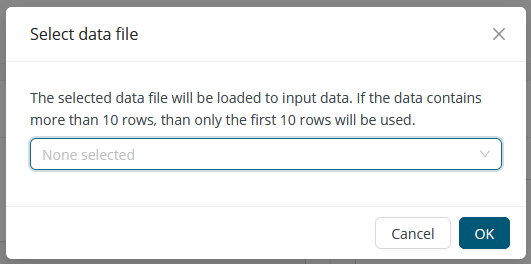
If you want to test with an existing data set, you can access your project’s data tables (but only if they are available in AI Cloud's native HDF5 format) by clicking the Select data button. As the data is transformed and pasted in to the Input data field, this example can help you put together future requests in the right format.
Transformer header options
When making a REST API call, you can invoke the transformer with an appropriate header. An error is returned if the header value is not valid.
| Header option | Description |
|---|---|
| 'Pass-Through: true' | Bypass the Transformer to minimize performance losses. Any of the following options will be ignored. |
| 'Input-Format: column' | Invokes the Transformer to create column-based input data |
| 'Input-Format: row' | Invokes the Transformer to create row-based input data |
| 'Output-Format: column' | Invokes the Transformer to create column-based output data |
| 'Output-Format: row' | Invokes the Transformer to create row-based output data |
Autoscaling
Autoscaling is now available for all types of deployments in AI Cloud. This feature allows you to automatically adjust the number of running service instances based on traffic demand — ensuring optimal performance while managing resource usage efficiently.
You can configure autoscaling settings when creating a new deployment via the Deployment creation UI.
Read more: Autoscaling